Garage Door Sensor Lights Blinking? How to Fix Misaligned Eyes
Garage door won’t close and the safety sensors are blinking? Learn how to read the lights, realign the sensor “eyes,” and know when it’s time to call a pro.
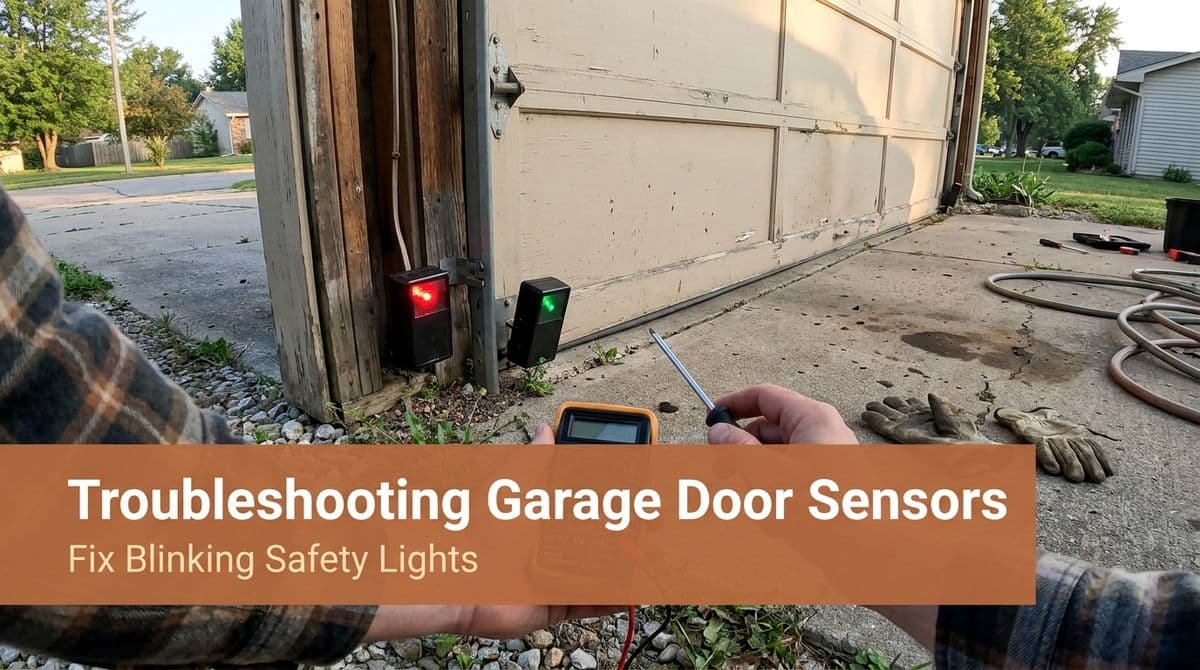
When Your Garage Door Sensors Won’t Let the Door Close
We recently got a call from a customer — let’s call her Ashley — who’d just had us out a few weeks earlier through her home warranty company. We’d moved her garage door safety sensors into new protective boxes, everything was working great…until her door suddenly stopped closing again.
“It’s doing the same thing,” she told us. “The door starts to go down and then pops right back up. You said it might be the sensors, but I don’t know what to look for.”
That conversation is one we have all the time. The good news? In many cases, you can fix this yourself in a couple of minutes — especially if the sensor lights are blinking or the “eyes” got bumped.
What Those Little Sensor “Eyes” Actually Do
Your garage door has two safety sensors mounted a few inches off the floor, one on each side of the opening. They form an invisible beam between them. If anything breaks that beam — a pet, a kid, a bike tire — the door is supposed to stop and reverse. That’s a critical safety feature.
If the sensors can’t “see” each other, your opener thinks something is blocking the door, so it refuses to close. That’s when you’ll usually see:
- The door starts down, then reverses and goes back up
- The lights on the opener flash
- One or both sensor lights are blinking or off
With Ashley, we suspected the same thing we see over and over: a trash can, broom, or kids’ toys nudged a sensor just enough out of alignment.
Step 1: Check Your Sensor Lights by Brand
On the phone, we walked Ashley through the first and easiest test: reading the lights on the sensors themselves. Different brands use different colors, but the idea is the same — both sensors should show solid lights, not blinking.
Chamberlain & LiftMaster Sensors
If you have a Chamberlain or LiftMaster opener, you’ll typically see:
- One green light – usually the sending sensor
- One amber/orange light – usually the receiving sensor
What you want to see:
- Green: solid
- Amber: solid
If either one is blinking or off, the sensors are likely misaligned or something is blocking the beam.
Genie Sensors
Genie openers are a little simpler to recognize:
- Both sensors usually have red lights
Again, both should be solid red, not blinking. A blinking or dead light usually means they’re not lined up properly or there’s a wiring/connection issue.
Step 2: Make Sure Nothing Is Blocking the Beam
Before you touch anything, do a quick sweep of the area near the bottom of the tracks:
- Move trash cans, storage bins, bikes, and lawn tools away from the sensors
- Check for cobwebs, leaves, or dust covering the lenses
- Wipe the sensor lenses gently with a soft cloth
Sometimes, that’s all it takes. If the lights stay solid after cleaning and clearing the area, try closing the door again from the wall button.
Step 3: Realign Misaligned Sensors by Hand
When Ashley asked if there was anything she could do herself, we told her exactly what we’d tell you: yes, in many cases you can fix the alignment in under a minute.
Here’s how we walk homeowners through it over the phone:
- Locate both sensors
They should be mounted on the inside of the vertical tracks, a few inches off the floor, directly across from each other. - Check the mounting brackets
Most sensors are in small brackets that allow them to swivel slightly up, down, left, or right. Sometimes they’re in small protective boxes like we installed for Ashley. - Gently move the sensor
With one hand, lightly twist or nudge the sensor head up or down, or slightly in or out, while watching the light. You’re aiming for that light to go from blinking to solid. - Match the angle
The two sensors should be pointing directly at each other at the same height. If one is tilted, adjust it to “look” straight across the opening. - Test the door
Once both lights are solid, press the wall button and see if the door closes smoothly.
In Ashley’s case, one sensor had been nudged just a hair by a trash can — a quick tweak with her hand, and the blinking stopped and the door started working again.
When It’s Not Just Alignment
If you’ve cleared the area, cleaned the lenses, and tried realigning the sensors but you still have blinking or no lights, something else may be going on:
- Damaged wires – pets, lawn tools, or even moisture can damage low-voltage sensor wiring
- Loose connections – the sensor wires may be loose at the opener head or at the sensor itself
- Failed sensor – occasional sensor heads simply fail and need replacement
- Opener issues – less common, but the opener’s circuit board can have problems interpreting the sensor signal
At that point, we usually recommend scheduling a professional visit. If your opener was recently serviced through a home warranty, like Ashley’s, your next step might be to call your warranty company so they can dispatch us (or another approved contractor) again.
Stay Safe While You Troubleshoot
A few quick safety reminders while you’re working around the door:
- Never stand directly under a moving door
- Use the wall button for testing, not the remote in your car
- Keep kids and pets away from the opening while you test
- If the door is acting erratically or sounds like it’s straining, stop and call a pro
Your sensors are there to protect your family. If a simple adjustment gets your lights solid and your door closing again, great. If not, that’s exactly what we’re here for — to track down the real issue and make sure your garage door is safe, reliable, and working the way it should.